

Build a Custom Renderable
This tutorial shows how to implement a custom renderable that draws a cube centered on a geographic position. It is intended for developers familiar with OpenGL, who would like to implement a custom WorldWind Renderable. It may be helpful to follow along with the completed tutorial on GitHub.
Contents
- How WorldWind Draws a Scene
- Implementing Renderable
- Managing Drawing State
- Orienting the Cube
- Drawing the Cube
- Picking
- Ordered Rendering
- Determining if the Cube is Visible
- Putting it all together
How WorldWind Draws a Scene
When WorldWind renders a frame, the SceneController sets up the global drawing state, and then asks each Layer in the Model to render itself. Most WorldWind shapes implement the Renderable interface. Renderables can be placed on a RenderableLayer, and will be rendered when the layer is rendered.
Rendering the scene consists of several stages:
- The SceneController draws the scene in picking mode. “Picking” is the process of determining which object in a 3D scene has been selected. During picking, each object is drawn in a unique color. The SceneController looks at the color under the cursor to determine the top object. This approach is described in the OpenGL Programming Guide. We will discuss picking further in the Picking section of this tutorial.
- The SceneController draws the scene in normal rendering mode. Each Renderable will either draw itself, or add an ordered renderable version of itself to the DrawContext’s ordered renderable list to be rendered later.
- OrderedRenderables are sorted by eye distance, and then drawn back to front. We will discuss ordered rendering later in this tutorial.
See the Concepts article of the Tutorial section for more information on the architecture of WorldWind.
Implementing Renderable
To draw a cube, we’ll write a class that implements Renderable. This object can be added directly to a RenderableLayer.
class Cube implements Renderable
{
    protected Position position;
    protected double size;

    public Cube(Position position, double sizeInMeters)
    {
        this.position = position;
        this.size = sizeInMeters;
    }

    public void render(DrawContext dc)
    {
        // 1) Set up drawing state
        // 2) Apply transform to position cube
        // 3) Draw the cube
        // 4) Restore drawing state to default
    }
}
Managing Drawing State
Before drawing the cube, we need to set up the OpenGL drawing state. We’ll do this in a method called beginDrawing. Any state that we change from the WorldWind default must be restored after rendering the cube, or it will cause other objects to render incorrectly. DrawContext.getGL provides access to the OpenGL context that we’ll use for drawing.
protected void beginDrawing(DrawContext dc)
{
    GL2 gl = dc.getGL().getGL2();

    int attrMask = GL2.GL_CURRENT_BIT | GL.GL_COLOR_BUFFER_BIT;
    gl.glPushAttrib(attrMask);

    if (!dc.isPickingMode())
        dc.beginStandardLighting();
}
Any state that we change must be restored after rendering:
protected void endDrawing(DrawContext dc)
{
    GL2 gl = dc.getGL().getGL2();

    if (!dc.isPickingMode())
        dc.endStandardLighting();

    gl.glPopAttrib();
}
Orienting the Cube
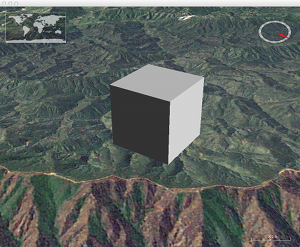
We need set up the OpenGL modelview matrix so that when we draw the cube, it will appear at the correct position on the globe. computeSurfaceOrientationAtPosition computes a transform matrix that will map the X axis to the vector tangent to the globe and pointing East. The Y axis is mapped to the vector tangent to the Globe and pointing to the North Pole. The Z axis is mapped to the globe normal at specified position.
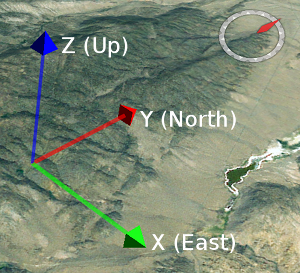
Local coordinate system with the origin at the cube’s center position, and axis aligned with the cardinal directions.
We’ll multiply with the active modelview matrix with the surface orientation matrix to position and orient the cube:
gl.glMatrixMode(GL2.GL_MODELVIEW);

Matrix matrix = dc.getGlobe().computeSurfaceOrientationAtPosition(this.position);
matrix = dc.getView().getModelviewMatrix().multiply(matrix);

double[] matrixArray = new double[16];
matrix.toArray(matrixArray, 0, false);
gl.glLoadMatrixd(matrixArray, 0);
Drawing the Cube
The method below that will draw a cube one unit on each side, centered on the origin. This method uses OpenGL immediate mode for simplicity, but real applications should use vertex arrays or vertex buffer objects for best performance.
protected void drawUnitCube(DrawContext dc)
{
    // Vertices of a unit cube, centered on the origin.
    float[][] v = {{-0.5f, 0.5f, -0.5f}, {-0.5f, 0.5f, 0.5f}, {0.5f, 0.5f, 0.5f}, {0.5f, 0.5f, -0.5f}, {-0.5f, -0.5f, 0.5f}, {0.5f, -0.5f, 0.5f}, {0.5f, -0.5f, -0.5f}, {-0.5f, -0.5f, -0.5f}};

    // Array to group vertices into faces
    int[][] faces = {{0, 1, 2, 3}, {2, 5, 6, 3}, {1, 4, 5, 2}, {0, 7, 4, 1}, {0, 7, 6, 3}, {4, 7, 6, 5}};

    // Normal vectors for each face
    float[][] n = {{0, 1, 0}, {1, 0, 0}, {0, 0, 1}, {-1, 0, 0}, {0, 0, -1}, {0, -1, 0}};

    GL2 gl = dc.getGL().getGL2();

    // Use OpenGL immediate mode for simplicity. Real applications should use
    // vertex arrays or vertex buffer objects for best performance.
    gl.glBegin(GL2.GL_QUADS);
    try
    {
        for (int i = 0; i < faces.length; i++)
        {
            gl.glNormal3f(n[i][0], n[i][1], n[i][2]);

            for (int j = 0; j < faces[0].length; j++)
            {
                gl.glVertex3f(v[faces[i][j]][0], v[faces[i][j]][1], v[faces[i][j]][2]);
            }
        }
    }
    finally
    {
        gl.glEnd();
    }
}
How this method works is beyond the scope of this tutorial. See one of the excellent OpenGL tutorials if you need a refresher. Using the drawUnitCube method, we can implement render. We apply a scale to make the unit cube the correct size.
public void render(DrawContext dc)
{
    this.beginDrawing(dc);
    try
    {
        GL2 gl = dc.getGL().getGL2();
        gl.glScaled(this.size, this.size, this.size);
        this.drawUnitCube(dc);
    }
    finally
    {
        this.endDrawing(dc);
    }
}
Picking
We’ve implemented code to draw the cube during normal rendering, but we still need to handle selection, or picking. During picking, we need to draw the cube using a unique color, and tell WorldWind that if this color is under the cursor, then the cube is the selected object.
protected PickSupport pickSupport = new PickSupport();

public void render(DrawContext dc)
{
    GL2 gl = dc.getGL().getGL2();
    this.beginDrawing(dc);
    try
    {
        if (dc.isPickingMode())
        {
            Color pickColor = dc.getUniquePickColor();
            this.pickSupport.addPickableObject(pickColor.getRGB(), this, this.position);
            gl.glColor3ub((byte) pickColor.getRed(), (byte) pickColor.getGreen(),
                (byte) pickColor.getBlue());
        }

        gl.glScaled(this.size, this.size, this.size);
        this.drawUnitCube(dc);
    }
    finally
    {
        this.endDrawing(dc);
    }
}
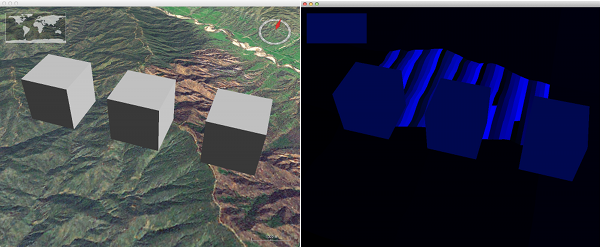
The image on the left shows a scene drawn in normal rendering mode. The image on the right shows the scene drawn for picking. Each object in the scene is drawn in a unique color. The SceneController looks at the color under the cursor to determine the selected object.
Ordered Rendering
Our code so far renders the cube at the correct position. However, it does not handle transparency or 2D mode correctly. Let’s see what happens if we use our Cube class to draw two cubes. The red cube appears transparent, but you can’t see the blue cube through the red cube. Instead you see the terrain behind the blue cube. In order to correct this problem, we need to implement the OrderedRenderable interface. An OrderedRenderable is a Renderable that can tell the SceneController how far it is from the eye point. The SceneController uses this information to draw ordered renderables in a back-to-front order, so that the objects blend correctly.
| No Ordered Rendering | Ordered Rendering |
|---|---|
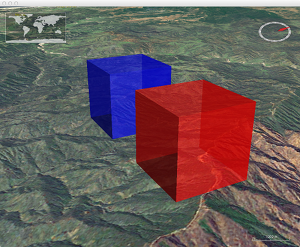 | 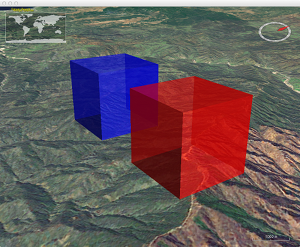 |
| Transparency is incorrect. The blue cube should be visible through the red cube. | Implementing OrderedRenderable causes the cube to render correctly. |
To implement ordered rendering we need to create an internal class that implements OrderedRenderable’s methods: getDistanceFromEye, render and pick. We also need to divide our render method into two parts:
- Add the cube to the ordered renderable queue during normal rendering.
- Draw the cube during ordered rendering.
In order to determine eye distance we need to know the Cartesian positions of the eye and the cube. The Vec4 class represents a point in Cartesian space. The View can tell us the position of the eye. Globe.computePointFromPosition can compute the Cartesian position of the cube’s center. Vec4.distanceTo3 can calculate the distance between the two:
Vec4 placePoint = dc.getGlobe().computePointFromPosition(this.position);
double eyeDistance = dc.getView().getEyePoint().distanceTo3(placePoint);
Here are the changes required to support ordered rendering:
protected class OrderedCube implements OrderedRenderable
{
    /** Cartesian position of the cube */
    protected Vec4 placePoint;
    /** Distance from the eye point to the cube. */
    protected double eyeDistance;
    /** The cube's Cartesian bounding extent. */
    protected Extent extent;

    public double getDistanceFromEye()
    {
        return this.eyeDistance;
    }

    public void pick(DrawContext dc, Point pickPoint)
    {
        // Use same code for rendering and picking.
        this.render(dc);
    }

    public void render(DrawContext dc)
    {
        Cube.this.drawOrderedRenderable(dc, Cube.this.pickSupport);
    }
}

public void render(DrawContext dc)
{
    // Render is called twice, once for picking and once for rendering. In both cases an OrderedCube is added to
    // the ordered renderable queue.

    OrderedCube orderedCube = this.makeOrderedRenderable(dc);

    // Add the cube to the ordered renderable queue. The SceneController sorts the ordered renderables by eye
    // distance, and then renders them back to front.
    dc.addOrderedRenderable(orderedCube);
}

protected OrderedCube makeOrderedRenderable(DrawContext dc)
{
    OrderedCube orderedCube = new OrderedCube();

    // Convert the cube's geographic position to a position in Cartesian coordinates. If drawing to a 2D
    // globe ignore the shape's altitude.
    if (dc.is2DGlobe())
    {
        orderedCube.placePoint = dc.getGlobe().computePointFromPosition(this.position.getLatitude(),
            this.position.getLongitude(), 0);
    }
    else
    {
        orderedCube.placePoint = dc.getGlobe().computePointFromPosition(this.position);
    }

    // Compute the distance from the eye to the cube's position.
    orderedCube.eyeDistance = dc.getView().getEyePoint().distanceTo3(orderedCube.placePoint);

    return orderedCube;
}

protected void drawOrderedRenderable(DrawContext dc, PickSupport pickCandidates)
{
    this.beginDrawing(dc);
    try
    {
        GL2 gl = dc.getGL().getGL2();
        if (dc.isPickingMode())
        {
            Color pickColor = dc.getUniquePickColor();
            pickCandidates.addPickableObject(pickColor.getRGB(), this, this.position);
            gl.glColor3ub((byte) pickColor.getRed(), (byte) pickColor.getGreen(),
                          (byte) pickColor.getBlue());
        }

        gl.glScaled(this.size, this.size, this.size);
        this.drawUnitCube(dc);
    }
    finally
    {
        this.endDrawing(dc);
    }
}
Determining if the Cube is Visible
What we’ve done so far is enough to draw the cube. But our implementation will draw the cube even if it is not visible in the active view. One of the most effective ways to boost performance is to not draw shapes that are not visible. We’ll add some code that checks to make sure that the cube is visible in the active viewport, and that the cube will appear larger than a single pixel.
First we need to create an Extent to represent the volume enclosed by the cube. The extent does not need to match the geometry of a renderable exactly, but it should completely enclose the geometry. For simplicity, we’ll use a Sphere that surrounds the cube:
protected Extent extent;

protected void makeOrderedRenderable(DrawContext dc)
{
    ...
    this.placePoint = dc.getGlobe().computePointFromPosition(this.position);
    this.extent = new Sphere(this.placePoint, Math.sqrt(3.0) * this.size / 2.0);
    ...
}
Now that we have an extent, we can determine if the extent intersects the view frustum. If it does not, then the cube is not visible and there is no need to draw it. In picking mode, we can test against the pick frustrums, which enclose only a small volume around the cursor.
protected boolean intersectsFrustum(DrawContext dc)
{
    if (this.extent == null)
        return true; // don't know the visibility, shape hasn't been computed yet

    if (dc.isPickingMode())
        return dc.getPickFrustums().intersectsAny(this.extent);

    return dc.getView().getFrustumInModelCoordinates().intersects(this.extent);
}
Finally, we’ll add checks to avoid drawing the cube if it is not visible, or if it is smaller than one pixel.
public void render(DrawContext dc)
{
    // Render is called twice, once for picking and once for rendering. In both cases an OrderedCube is added to
    // the ordered renderable queue.

    OrderedCube orderedCube = this.makeOrderedRenderable(dc);

    if (orderedCube.extent != null)
    {
        if (!this.intersectsFrustum(dc, orderedCube))
            return;

        // If the shape is less that a pixel in size, don't render it.
        if (dc.isSmall(orderedCube.extent, 1))
            return;
    }

    // Add the cube to the ordered renderable queue. The SceneController sorts the ordered renderables by eye
    // distance, and then renders them back to front.
    dc.addOrderedRenderable(orderedCube);
}
Putting it all Together
We’ve seen how to draw, position, and orient a cube in WorldWind. We’ve also seen how to implement the cube as an OrderedRenderable, how to handle picking, and how to determine if the cube is visible. The full cube class is available in the WorldWind distribution at gov.nasa.worldwindx.examples.tutorial.Cube.